Saturday, 11 October 2014

467 - X-Wing Game 3 - Shuttle Escort Scenario

Got a third game in last night - against DS again...and it was an absolute stormer!
We both had a couple of new ships (oops!) we were keen to field, but we wanted to do more than just face off in two lines and blast away, so we thought we'd try a more narrative approach as I mentioned before:
  
To that end, we thought we'd try a mission with a trio of lowly TIEs escorting a Lambda shuttle through a Rebel ambush. The Rebels were striking from both flanks with (in joyously alphabetically order),
  • 2 A-Wings,
  • 1 B-Wing,
  • 2 X-Wings and
  • 2 Z-95 Headhunters.
But it was okay, because the Empire had sent out some big hitters to bring the shuttle home safe - specifically, Carnor Jax in his TIE Interceptor and a Alpha Squadron Interceptor both flanking DS's rather intimidating new Firespray.

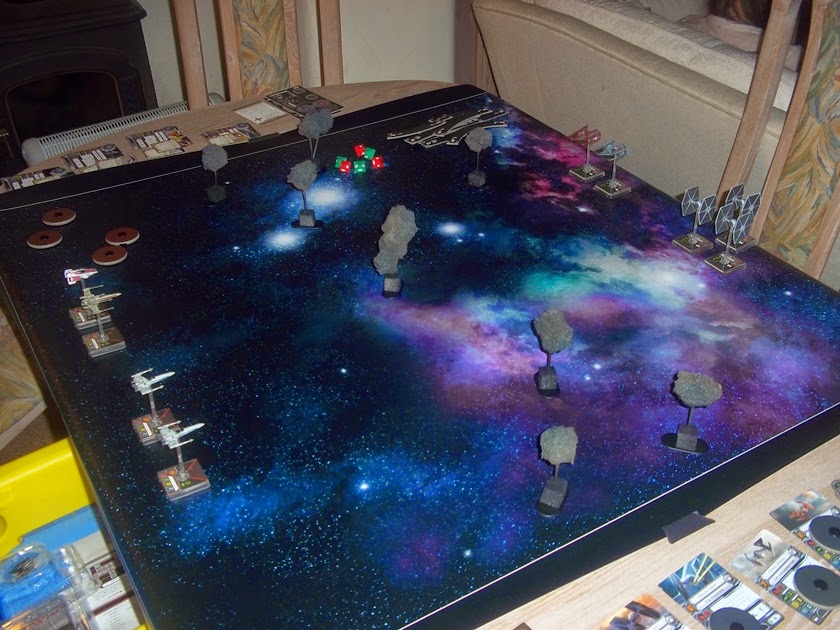
The mission we blagged involved - very simply - the Empire having to move the shuttle across the table from top-right and off their bottom-left corner (all deployment zones were Range 3 from corners) and the Rebels trying to destroy the shuttle. The idea was adapted from the published shuttle mission, but rather than give the Empire 20 more points (essentially the shuttle for free), we just did away with the Rebel reserves. It worked out at 150 points each.

The trap was well sprung, but the inexperienced Rebel pilots bumbled their navigation at first and the Headhunters and A-Wings failed to get their target locks for an early launch of their ordnance. Across the board the X-Wings were closer to the TIE Interceptors than they realised, and they were the first to take a pasting.
This pasting continued with the Rebels losing both an X-Wing and the ordnance-carrying Z-95 before they were able to pick off a lowly TIE fighter. Soon the rebels were being squarely whittled-down, and once I lost my B-Wing we both thought that the Empire would soon carry the day.

But in their arrogance, the Imperial Navy had overlooked the brace of zizzy little A-Wings streaking after the shuttle and picking off the last of its shields from long range.
And then, Just as the shuttle was about to exit the board, both A-Wings - almost unmolested - were able to finally close the gap to Range 1, focus their attention, and let fly with their proton rockets. With five attacks each at range one, AND with focus to help, the shuttle was doomed, and its vital high-ranking Empire passengers were lost in the ensuing fireball.

Stunned and dispirited, the Empire pilots were immediately recalled to base, leaving the Gemmer Sojan to lead the equally stunned Rebel pilots limping away.

A successful ambush, yes, but at what cost?
In summary:
  • The scenario worked really super-well and told a properly cinematic story - neither of us was expecting the Rebels to win after about turn 3;
  • It was REALLY fun to try out some new toys and rules (especially secondary weapons);
  • The A-Wings did exactly what they were supposed to do (albeit slightly later than I'd hoped) - proof if proof were needed that detailing units to specific missions really can be a good idea (who'da thunk it?!);
  • The minis looked AMAZING on he mat;
  • We're both getting a wee bit better at manoeuvring and DS played a good, sound, tactical game - certainly better than me, since he was able to outmanoeuvre me and anticipate most of my moves! Most.
  • The Standard A-Wing and the Rebel Aces A-Wing together look like bowling shoes.
Fan-bloody-tastic.

Thanks for reading,

- Drax.

PS: Sorry the pics are just of the endgame!

Monday, 6 October 2014

466 - '6MMRPC' #6 - More Painting Finished...and a Discovery.

I've not much time to post, but I've done with bloody work for tonight, and I thought I'd better note that I did, in fact, manage to paint last week after all:

I finished off the (GW) 'Sepia' wash for 3Pl of my 4KSLI infantry company, but having done so, I thought it didn't look quite right.

This led me to compare one of my stands from 2Pl - which I was far more happy with at the time - and I discovered that rather than sepia I had in fact used the black wash (as seen in the photo), so I re-washed them.

And now I'm happy with them.

That just leaves grass and bushes. And dullcote.

And given the thunderstorm that's just kicked in in coastal rural Devon, I don't think I'll have chance enough for spraying anything for days yet...

...Even if I did have any time.

- D.

Saturday, 4 October 2014

465 - Got in a Proper X-Wing Game...and got TABLED!

Hullo, Drax-Fans!
I'm delighted to note that this week I managed to get another game of X-Wing in. Fancy that: a game I can play that I (a) don't need elaborate scenery for, (b) can play with a colleague, (c) can play reasonably quickly and (d) don't have to make a round-trip of 60 miles for the privilege of playing!
[For those of you unfamiliar with the rural South-West of England, try to imagine driving most of that distance through pitch-black, rain-drenched, claustrophobically-high-sided single-track roads whilst burning fuel at £1.43/litre...or whatever the hell that is in $/gallon - not fun!]

Well, I went a got myself a cute lil' A-Wing (because I'm a sucker and I'm trying to learn to play with a more aggressive, manoeuvrist style in my table-top gaming), and of course I just have to play Rebels. We went for 100 pts for our first post-intro 'proper' game - all the other models belong to DS, my opponent. After humming-and-hawing for five minutes, here's what I went for:
...except I forgot to include Tycho Celchu in his A-Wing, and  whatever upgrade he had which grants you an extra hull point, but the rest are a Red Squadron X-Wing with R2-D2 and two Z-95 Headhunters: Tala Squadron Pilot with (I think) Cluster Missiles and Airen Cracken with Proton Torpedoes and Ammo Failsafe [I later realised he couldn't take torpedoes, so we'll chalk that one up to an over-enthusiastic ground crew].
For his part, DS brought along a Right Bunch O' Bastards:
Two TIE Interceptors - Carnor Jax and Tetran Cowll - and three TIE Fighters - Howlrunner, Backstabber and Academy Pilot. Between them they carried a modest handful of upgrades. If I had any strategic nous at all I would've at least read these cards before the game. I don't; I didn't.

We deployed. This is where my stupidity began, and approximately where it ended, too. From this point on, this post-battle analysis will virtually cease, because my tactical stupidity will speak for itself...
'Easy,' I thought, 'I'll just fly my two weakest craft straight at his TIE swarm.' - Idiot.
[Above] Turn 1 - "Advance in line abreast"
[Above] End of Move 2...
[Above] ...and end of Headhunter 1.
[Above] End of Move 3...
[Above] ...and bye-bye Headhunter 2.
[Above] End of Turn 4, during which my A-Wing tried to pull a red stunt whilst stressed, so DS got to move him for me. D'oh!
[Above] End of Turn 5 - hanging in there.
[Above] End of Turn 6 - still very much failing to kill anything. I should draw your attention to Howlrunner (far left) who - after stitching me up like a kipper in the opening turns - decided he'd had enough and simply buggered off stargazing for a while!
[Above] Turn 7 - very nearly the end...
[Above] Turn 7 - very actually the end.
Bugger.

Did I learn some lessons from this? Yes. Did I get nearly enough sleep after this game? No. No, I sodding didn't.

It was a great fun game, but the Rebel leadership was pitifully outclassed: DS played pretty damned well - a couple of rookie errors notwithstanding. More than anything else I've learnt not to underestimate the TIE fighter en masse.

Bastards.

I believe it was none other than Adm. Lord Nelson who famously intoned, "You must hate the French Academy Pilot as you hate the Devil himself".

And he was right.

Ta-ra for now: I've got a fresh cuppa and I'm off to actually do some painting for once! Yay!

- Drax.

PS: British readers of my age (mid-30s): points for getting the kids' TV reference in this post's salutations.