Tuesday 25 April 2017

596 - Bolt Action 'Manhunt' Scenario

Hullo, All.

I'm still visiting my hometown of Portsmouth fairly regularly to help out my dad, and for the second time I was very pleased to be able to get in a game of Bolt Action - once more at the excellent 'A Fistful of Dice', and this time against a new opponent: the thoroughly pleasant and personable Ed.

Here are some snaps of Ed's beautiful (and fluffy!) Fallschirmjäger force:
Sweet StuG!
Medium mortar, light howitzer and Panzerschreck
FSJs
Roll call: In addition to his HQ+1, Ed brought along five FSJ
squads, med mortar, light howitzer, Panzerschreck and, of
course, the StuG
 ...and here are some of my 4KSLI chaps:
[Usual stuff]
LOVELY STAGHOUND!
Roll call: It's my normal lorried platoon - 2Lt, 2" mortar, PIAT,
sniper, 3 sections, 3 lorries, Arty FOOa Cromwell and Staghound.
Having spent a few minutes comparing notes and working out the terrain, we rolled for a mission - in this case, the tactically challenging 'Manhunt'. For those of you unfamiliar with this scenario, the attacker (in this case, me) has to kill the enemy's officer in assault. The officer starts off in the centre, with half of his troops around him, and whilst the attacker's first wave piles on from one edge, both sides' reserves can come from any table edge...except that edge from which the last enemy unit entered this turn. This is a very confusing rule, and tricky to keep track of. Luckily, we both tripped over it, and both helped each other out in good faith. Proper job.
(Taken not so much for illustrative purposes, but to remind me)
The table and deployment:

Rather pleasingly, the German force was all all deployed in the woodblock in the middle, which looked suitably appropriate - the near side in this (and most) pics is mine.
My sniper is in the ruin, bottom-left
The game:

I was uncharacteristically lucky with my preliminary bombardment: one of the FSJ units took a casualty and all mostly took two pins, and then my Brits started to flood on - anticipating that the FSJ would have to shake off their pins, I was able to drive two of the lorries in and disgorge straight into a firing line.
The white die above the howitzer is the FOO's aim point.
"3 Section - de-bus!"
"2 Section - de-bus!" - the OC is at this end.
The FSJ are starting to get worried...
Turn 2 and the Brits assault into the woodline,
but they just cannot reach the German Officer...
...and someone - maybe the German officer -
guns down 2 Sect to the point where they break.
At this point, two of the FSJ squads swarm onto my table edge...
...capturing one lorry despite its attempt to move away.
Meanwhile..."it's the horns of the buffalo!" - 1 Section, the
Staghound, the PIAT, 2" mortar and the Cromwell all come on
from the German's side to close the trap. Hooray!
BUT...all is not right. The StuG has charged up the road and
gunned down 3 Section, and a sneaky (but utterly inept)
Panzerschreck has outflanked the Cromwell. D'oh!
...And then the artillery came down.

Yup. On turn 3 - despite the inconvenience of my troops being stupidly nearby, the air was rent by the whistle of incoming 25pdr rounds. It was not too bad...right upto the point whereby the German officer copped a big explosion right on his head. His runner was killed and he himself - being pinned to distraction - failed his test and fled the field. Technically this made the game an automatic draw, which was a shame, as - having secured my table edge and killed off 2 and 3 Sections - Ed's officer had a good chance of surviving.  

Naturally, at this point we agreed to continue anyway, but I must admit that I took it less seriously now. For example, rather than take on the StuG, my PIAT team assaulted their Panzerschrecky counterparts for a giggle...and lost, and my 2" mortar did much the same to his late-arriving medium mortar team. They also lost. 
At some point, the last of the original three FSJ squads was assaulted to death by 1 Section:
Shortly after this (turn four?), in the middle, my Staghound was immobilised by a Panzerfaust before being swiftly avenged by 1 Section...
...and the hapless Cromwell - after being missed I think three separate times by the bumbling Panzerschreck team - finally got brewed up by the StuG. 
 This kinda sucked, but it certainly looked cool!
...and then we called time. It's a shame it went to a draw: Ed played well and could've won (the sniper - who was my backstop - shot well all game but killed nothing), but it was certainly fun and there were some lovely cinematic moments!

Most valuable units? - Probably my 1 Section and the StuG. 

New things learnt? - (1) pins on spotters don't affect the morale of the mortar, and (2) the 'Tough as Boots' rule really is useful for my Brits.

So there you go. 

Another game, another ace new opponent, and a lovely looking force of FSJ. Thanks, Ed!

Cheers,

- Drax.

Friday 21 April 2017

595 - TANK WAR!

Yup - I finally had a proper game of the Bolt Action supplement, Tank War! ...and there are three key words to describe it: 

  • fast!
  • brutal
  • fun!
I played against Mattenbury (again), at Dark Star (again), and he really is a thoroughly sporting opponent; not least because he didn't object to me playing with unpainted Germans for our first attempt at Tank War. 

Forces:
Mattenbury's Brits:
Two small sections of Commandos in [my] Bren Carriers;
3 Cromwells; 1 Firefly; free Observer; M5; PIAT; HQ and more
Commandos.

My (unpainted) Germans:
Two Panthers; a Panzer IV; Sd.Kfz.251/22 (with a Pak.40); 2
squads of 5 veterans (each with 1 SMG and 3 Panzerfaust) and
2 Sd.Kfz.251/1 Hanomags. (the extra rifleman was a confusion)
What Happened: 

Well, we rolled up 4 objectives and rolled onto the table to try and grab them. 

And the Brits got absolutely tonked. 

Even without the stupid new 'Tiger Fear' rule (which I refuse to entertain playing as the German player), my Panthers were m.o.n.u.m.e.t.a.l.l.y intimidating, and the dice-luck was all with the Germans...

...Well, the luck was with the side that had two heavy- and two super-heavy Anti-Tank guns, against the Brits' single super-heavy and three mediums.

Here's the skinny:
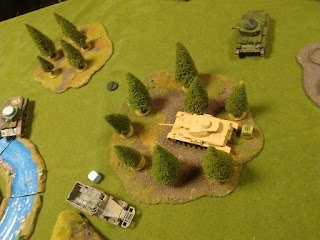
The board during Turn 1. My Panther (cream; bottom)
has just destroyed the first Cromwell (top-right).
Focus on Panther...
...then focus on its victim.

Turn 2. By this point, everyone except outflanking troops are on
 the board, and another Cromwell (top middle; turret inverted) is
destroyed. The Firefly is tucked in behind the building top-right,
but by this point it's both pinned and immobilised.
Turn 3. By this point, the Firefly is dead, freeing up my right
flank completely for my PzIV to start its charge across the table
(top-right) whilst my 251/22 moves up to an objective (bottom-right),
the yellow Panther awaits an incoming arty barrage and, on the left,
Commandos converge on my Hanomag as the last Cromwell tries
to engage it from top-left. The Carrier outflanked.
What happens when a Panther unleashes its mighty MMGs.
Turn 4. Yellow Panther survived with three pins and rallied;
top-right is Hanomag 2, which outflanked to grab the objective
in the hamlet, the Pz.IV and 251/22 continue to harass the centre,
and on the left, the other Carrier arrives as the last Cromwell
keeps plugging away. The PIAT is up on the rocks, now...
Mattenbury was worried about losing empty transports, but
when his Commandos de-bussed and gunned down my last two
men (I forgot they were vets - d'oh!), we realised that actually
the Marines were closest to my Hanomag - so that went instead!
Turn 5: KABLOOM! The Pz.IV dispatches the last Cromwell
and his arty observer, thereby claiming objective 3 for me,
and the empty M5 is saved only by his lone and luckless PIAT. 
I love this shot.
Caring nothing for the three Commandos (comprising 75% of
Mattenbury's remaining troops), my painted Panther crunches
onto the bridge, thereby taking the objective and automatically
destroying the empty Carriers.
Endgame. 

Result?

- A crushing German victory. Mattenbury conceded with just a PIAT, 3 marines and an M5 left to face everything of mine but for a valiant six-man squad and their transport. 4-0.

Reflections

Brilliant. Just brilliant. I was actually unlucky with my order dice for the first two turns, but those German big tanks are just all kinds of fearsome, and Mattenbury was profoundly unlucky. 

For once, I'm actually happy with most of my tactical decisions - especially my outflank, which worked perfectly - and though I was unsurprised by the underwhelming offerings of the 251/22, I must say that those tanks were amazing. 

I need me some more Tank War!

Cheers, 

- D.

Friday 14 April 2017

594 - A Rather Splendid Game of Bolt Action

Hullo, All.
On the last day of March, I managed to make it to the club in Torbay again, and this time I got to play - much to my surprise - against a chap who happens to edit a certain high-profile wargaming magazine... I won't go into too many details about the game, but it was an absolute corker, and I even managed to get some decent photos for a change! 


My opponent was the very best kind of foe - pleasant, sporting and engaged - and even though his lovely Germans were given a sound thrashing by my brave boys of 4KSLI, he bore it admirably well. Of course.

The game was 'No-Man's Land' I think - or whichever one is a meeting engagement where both sides get a preliminary bombardment. 850 points. 
A lovely table to scrap over!
Naturally, my prelim bombardment didn't come in.
Naturally, the German one did, pinning almost everyone
and killing the sniper's spotter. Drat!
I took my normal platoon but with the 2" mortar substituted for the way more useful 3", and they were supported by a Cromwell and the ever-gorgeous Staghound.
For their part the Germans had (I think) 4 smallish squads (some of which may have been veterans), a StuG and PaK-40.  
 Here, then, are some pics of the battle: 
The German HQ unit directs things well...
...as their troops move up...
...and their 'borrowed' truck drops off the PaK-40. *gulp!*
The German left flank as the StuG arrives from reserve.
StuG didn't choose Thug Life.
Can you guess where the British sniper might be? 
Centre. My Cromwell took out the PaK-40 before being StuGGed.
My left. The Staghound arrived from reserve to help out...
...but struggles to finish off the advancing German squad. 
Eventually, I assaulted them to stabby death. 
By this point, we knew the game was up for the Germans, so
my Staghound 'bravely' emerged to face the StuG. No luck.
End game. A general advance to mop-up the remaining Germans.
This thing was a constant pain. I would've swamped it in the end,
mind: it was almost out of infantry support.
So that was my surprisingly photogenic game against a new and very pleasant opponent. Here's to more, eh?!

Thanks, All,

- D.

PS: You know what did nothing useful at all? - my 3" mortar. 
Know why? - because I still haven't actually painted the wretched thing!