Wednesday 21 December 2016

583 - New FLGS and a 750pt Bolt Action Game!

Hullo!

Yes, all of the above is true - I've found a new FLGS: 'Darkstar Gaming' in Plymouth. It's fairly new, but open, friendly, and not too terribly inconvenient for me... which is a development!

To my particular joy, I broke my duck there with my pal Mattenbury: we played a friendly 750pt game to both try out a few ideas and increase our familiarisation with the 2nd Edition rules.

It was a blast!

Forces:

Mattenbury very gallantly let me field a cheeky wee 'armoured platoon' - nothing too scary: a troop of Recce Carriers supported by two five-man squads, a Sniper team, a PIAT team (in a fourth Bren Carrier) and the obligatory Free Artillery Spotter. There was a 3-Ton Lorry to transport the Toms, of course, too. Oh, and a Cromwell CS:
My babies!
These pics came out well - I like the black background!

For his part, Mattenbury brought his Commandos (I was expecting Americans, but they're not painted yet): a five-man command squad (such a great idea!), two five-man squads, two(!) Light Mortar teams, a 25pdr, a Sniper team, Arty Spotter and a Crusader AA:
The Commandos were armed by squad: rifles or SMGs.
Set Up:

We rolled for a mission and got 'Demolition', which is essentially capture-the-flag, but it's instant death after a unit is plomped on the enemy's base - no contestation. 

Deployment in some missions of 2nd Ed has taken a clever turn: it's a little more time-consuming, but now you draw dice to deploy units. I liked this, although I didn't do it quite as well as I ought to:
My deployment edge. Foolishly, I split up my Recce troop,
and they couldn't benefit fully from their radios.
Mattenbury did a better job with what he had, I must say, setting up his 25pdr exactly where he should have - commanding the centre ground utterly, and managing very cleverly to give his Crusader AA far more flexibility than I thought it'd have.
Note the two objectives and the 25pdr's killing field (in red)
A close-up of Mattenbury's deployment: the 25pdr
covers its arcs, and the objective is that round base
just this side of the hill. White die = my arty aim point.
The Game:

Turn 1: The first turn was relatively quiet, as everyone was hidden. Artillery spotters on each side placed their aim points, and my sniper (to my great surprise) killed his. Having thus given away his position, my sniper was then instantly wiped out by a very lucky 25pdr shot. Bastard.
End of a Veteran Light Mortar Team
On my right, the Bren Carrier (carrying my PIAT) sallied forth and gunned down a light mortar team before his Crusader AA did some sneaky reversing and then let fly in revenge. Pins. My vehicles and troops on the left edged forward for pot-shots, but it wasn't until the turn's end that I realised flank I'd moved everyone on the left closer to his artillery aiming point! BUGGER.
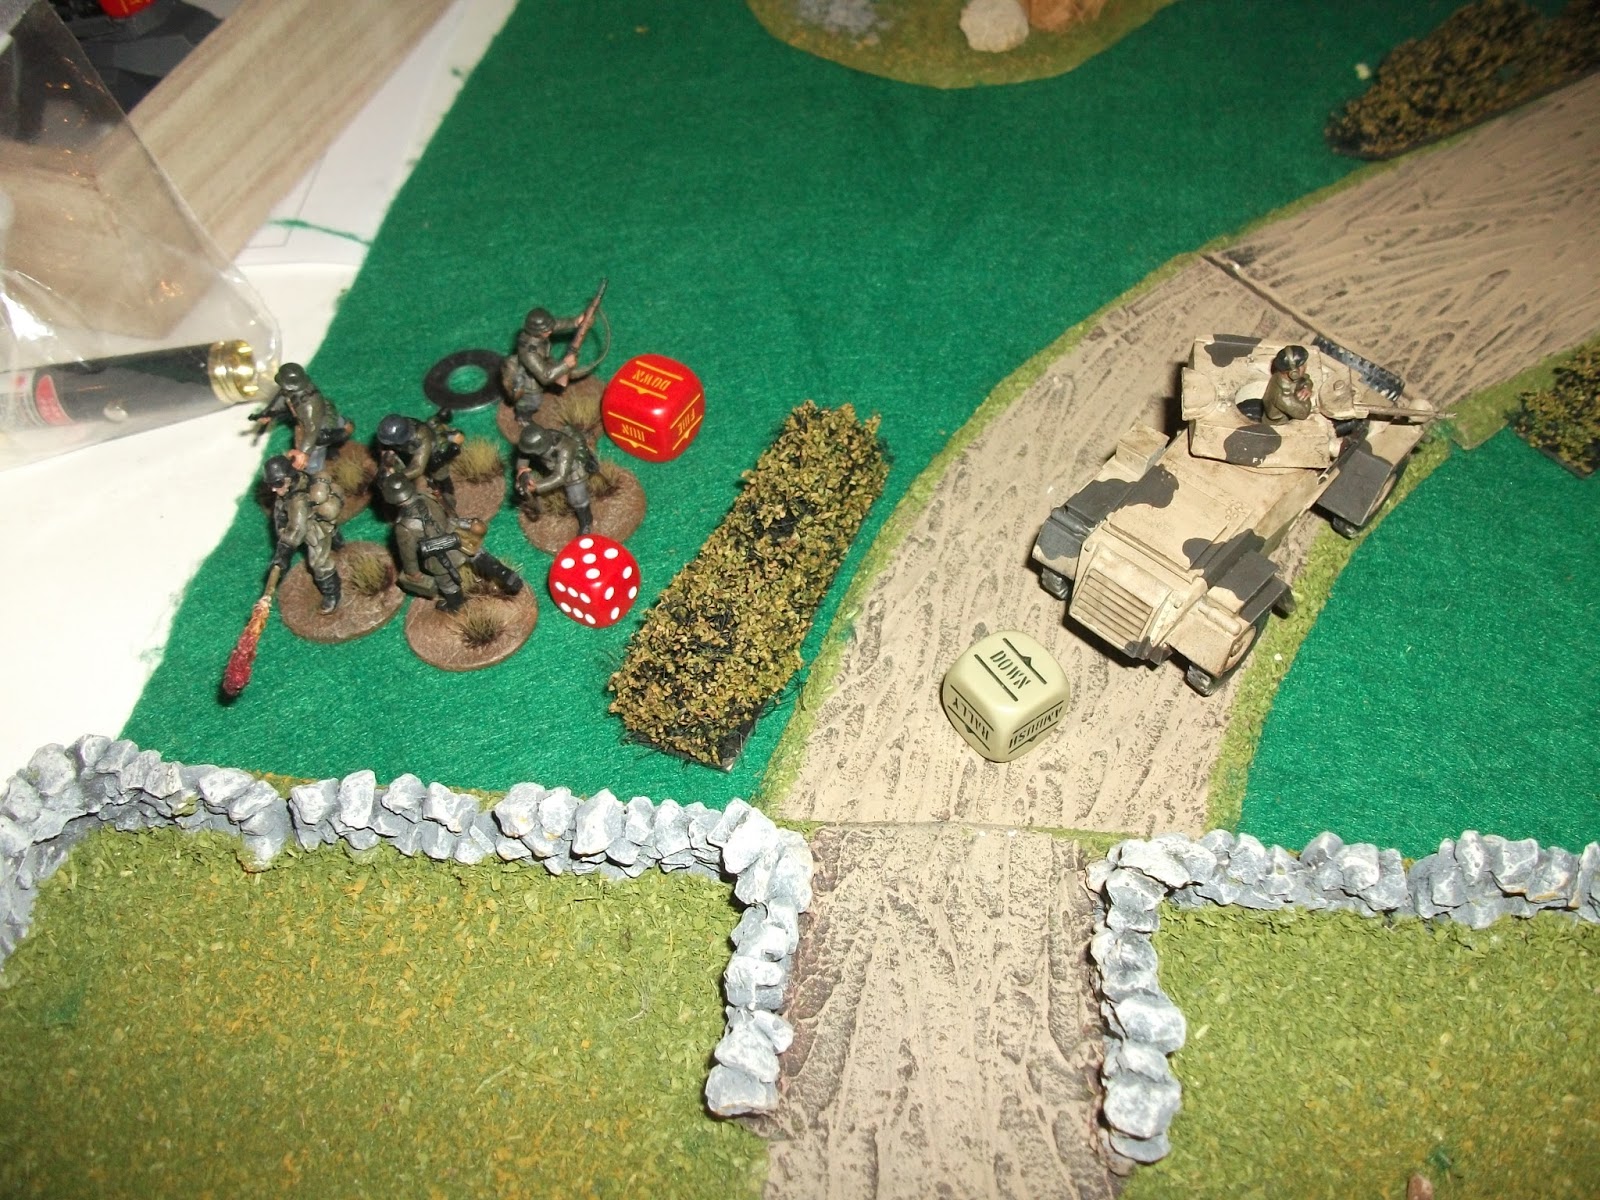
Pins on the Bren Carrier from the sneaky Crusader (top-right)
The extent of my movement by the end of Turn 1. Note how foolishly
close so many of my units are to his artillery aiming point (red die).
Turn 2: This turn was a bit of a dud, really - both artillery rounds failed to materialise and we traded some ineffectual long-range shots. Mattenbury was being cautious because he was - quite frankly - out-gunned, and I was being way too cautious because I was unnecessarily afraid of both the artillery strike which had now moved to the centre ground and his 25pdr...which could easily kill a recce carrier but which, frankly, would struggle against the Cromwell. The only thing of note, really, was the blasted Crusader penetrating my Bren Carrier (the PIAT-mobile) and fluffing its damage, to give both it and the PIAt a bunch more pins. Boo.

Turn 3: At last both of our artillery stonks arrived and did untold damage on...nothing. The only casualty of both was the 25pdr, which took a couple of pins. If either had arrived on turn 2, it could've been a very different story indeed. During this turn, a number of key things happened: (1) I finally started closing on the objective, suppressing the 25pdr with MG fire as I went to pin it out of usefulness; (2) I realised (he told me!) that Matt's intent was to drive his crusader up to my objective and claim it that way...bugger. I hadn't thought of that - I'd assumed he would just inch his Commandos closer then overwhelm me. I could've been gamey and used my carriers and troops as a screen, but I try not to roll like that. Instead, I tried to bring the fight to him!
Shot 1 from the PIAT. A swing and a miss.
(3) With this in mind, my 6-pinned Bren Carrier rallied (2nd Ed 'Rally' is soooooo much better!) and disgorged its PIAT-toting passenger, who predictably missed a long-range shot at the Crusader; (4) Mattenbury's central squad of Commandos started their new game of ineffectually charging one of my recce carriers just to get a consolidation move out of it. I started thinning their ranks with some withering Bren and rifle fire, but they're tricky buggers to kill!
My 15/19 KRH Cromwell advances into the muzzle of the field gun...
...and the Comando HQ backtracks for morale support.
Turn 4: Mattenbury's Commandos on my right flank burst out of their building to unleash short-range SMG-themed death on my poor regular PIAT team...and completely fluffed it! They killed his loader, but he was made of sterner stuff, and after steadying his unruly Heath-Robinson contraption, sent a shaped charge right squack into the flank of the AA Crusader. Kaboom!
KA-BOOM! - I love this pic!
With this, the Commandos knew they were doomed. They fought on bravely, but as the Cromwell of Destiny rumbled onto the Objective of Sealed Fate, they knew it was game over...and indeed it was!
In Summation:

The game was an absolute joy to play, despite the simplicity of the terrain (more will be a-comin' as I understand it, as BA takes off) and Mattenbury was - as he always is - a very pleasant and sporting opponent. In particular, it's grand to play someone who's chilled about things like taking the time to look rules up as we go.

The movements of my various vehicles. Just experimenting.
Until next time, then,

Cheers for reading,

- D.

Saturday 10 December 2016

582 - More Germans are Coming. Verdammt!

Oops!

I did say there were more Germans, didn't I?

Here they are (with only a couple of teeny-tiny tanks to come - I promise) - and all labelled up for your convenience:

Without going into the detailed whys and wherefores of everything, I managed to secure the following - very cheaply - in order to put together those models above:


  • The Germans from two of the new 'Band of Brothers' starter sets (24 men; 2 halftracks)
  • Twenty already-based Heer infantry (20)
  • The 'Blitzkrieg' German infantry set (30 men)
  • One 'Blitzkrieg' and one Heer medium mortar (2 mortars)
  • One Panzer IV H (you've got to have a tank, right?)
Medium Mortar and MMG teams. There's a thin, rigid plastic
disc stuck beneath the holes, but it's see-through!
At first, I felt a bit frustrated at the slightly odd mix, but this was mollified as I really quite fancied taking some Luftwaffe Field Division as inexperienced troops for a change, and they often still wore jackboots and some more obsolete uniform...but then I got the new army book and bafflingly - inexplicably - the Luftwaffe squads are not allowed to take LMGs! Yup: despite the info-box covering the variety of different LMGs the Luftwaffe troops were issued, they cannot take LMGs. Go figure.
The Medic (behind the officer, bottom-left) has a converted med bag.
Sooooo, instead I made the call that my jackbooted troops would play the dual role of either second-line garrison troops in Normandy, suddenly deployed to help plug a gap or - if needed - a smattering of early war troops for early war scraps. There are still disadvantages to this, mind: namely that (a) they have early-war-style gascloaks in a prominent chest pouch - rather anachronistic after '41, and (b) the only 'inexperienced'-rated troops in the Normandy selectors are...wait for it...Luftwaffe Field Division...who can't technically take their LMGs. 

*sigh*

All of this means that I now have a sprawling German force, totalling about 2000pts (and a little more yet to come) which can be deployed either as one single, rag-tag German force comprising three platoons, or separately as early-, mid- or late-war!

As for the models themselves and their basing? Well, I shall talk about those, I suspect...next post.

Right now though, I'm a-noddin' off at my keyboard, so

Goodnight for now...

- Drax.

Tuesday 29 November 2016

581 - The Germans are Coming!

Er... Yeah.

This happened.

And there's more, my friends, where that came from.

Significantly more.

- Herr Drax

Friday 25 November 2016

580 - Bolt Action 2nd Edition Gaming...at Last!

Hullo, and Happy Thanksgiving!

I managed to get a quick game in last Friday - another against the very sporting Pete, and his second introductory game to Bolt Action. This was also our first attempt with the excellent second edition ruleset. I probably won't discuss the rules on this platform, as many others have done that to death already, but suffice it to say that I approve.

The game against Pete was great fun, mostly because of the following factors:
  • He's a great opponent and happy to play an open, collaborative game;
  • The table looked great! (see above)
  • The game was extremely close - far more so than we anticipated;
  • There were some wonderfully cinematic moments (more on that below) and
  • I had to face my very own lads of the 11th Armoured Division!
Facing my own troops came about because Pete was borrowing some Germans, and having swiftly sketched up a Veteran German list for them (we played 850pts) I was keen to show an open hand, so we rolled to see who'd get to play which.

This turned out well for me in the end, because I've started some of my own Germans at last...but that's another story for another post...

ANYWAY. We rolled up the new 'table quarters' mission - whatever it's called - and had an absolute blast!
My table quarter was top-left in the picture above.
Pete's was bottom right, but we chose the non-central
stream as the divide, with a bridge and a ford.

In terms of forces, They were - broadly - as follows:

4KSLI
2Lt, 3 Sections (one with only 8 men), 3" Mortar, Sniper, Arty FOO, PIAT, Staghound and Cromwell CS. All Regular apart from the Cromwell, which was Inexperienced.
Pete's set-up. Nice and bunched up.
Pity my only template was a medium mortar!
Germans
1Lt, 1 Squad with ARs and 1 LMG, 1 Squad with rifles and 2 LMGs, Sniper, Medium Mortar and a  PaK40. All Veteran apart from the Mortar and PaK40.
The two German Squads (rifles actually in the house)
The ford is to the left - annoyingly it was difficult going. Rightly so.
Turns 1-2

Essentially, the British infantry advanced into the top corner with some success but got gunned down on the road (assault rifles and LMGs are nasty). The Pak40 threatened the road but got taken out by the second indirect shot from the Cromwell and the Germans made a slow move toward the ford, supported by their sniper and mortar (which took out the British mortar!). The Panzerschreck and PIAT teams headed toward each other.
Deployment and movement. 
British movement begins. Slow and steady. And fraught.
Turns 3-4


Now the Staghound came into its own, moving up to head the Germans off at the pass (the ford): its ten shots were brutal, but the Veterans only lost one. 5+ is hard to kill! They got their own back by managing to assault and pin the Staghound and pinned it a little more thereafter.

The Cromwell moved in to assist, now the PaK40 was no more, but a wonderfully lucky shot from the Panzerschreck caught it in the side armour and blew it sky-high. As the infantry on both sides were whittled down, the two officers got stuck in, with the Brits killing two grenadiers, but getting wiped out themselves.

At the other end of the table, the delayed artillery strike was moved toward the German mortar and they were unlucky enough to catch a heavy howitzer round...which they all promptly survived on a roll of three ones! Tee-hee! Glad I didn't bother going down.
I had to leave at 21.00, so we called it a hard-fought draw. The Germans were definitely gaining control (despite a 'FUBAR' roll) and despite losses still outclassed the Toms...but they would have struggled with the Staghound, and the Panzerschreck would've taken another two turns to get anywhere near engaging it.
Boom!
The shot-up Germans fight through to consolidate after pinning
the Staghound.
The Pnazerschreck team braves the 'threat' of PIAT rounds
from the surviving British AT man, by the yellow die.
(The reverse angle)
Endgame. Note the German HQ, to the right of the Staghound.
Note also the lack of British officer, recently KIA. 
After four turns we'd fought to a surprising draw, but every step of the game was really good fun - and Bolt Action's second edition really is fantastic!

Cheers to Peter and David - here's to next time, eh?!

- Drax.

Saturday 12 November 2016

579 - Bolt Action Tourney Aftermath: Part 3 - Forces

Situation: Friendly Forces.

Bearing in mind that this is a 1st Edition list for a 1st Edition tournament, here are the brave Sikh boys who did me so proud in the tournament (courtesy of the excellent Gregg over at easyarmy.com):
Also, it's worth noting that this list is 850pts, as easyarmy doesn't quite accommodate the Indian list's free 100pt 10-man regular squad. 


...and here they are again, arrayed with my mate Mattenbury's complementary Desert Rats:
(A key to it all)

It really was a stonkingly good tournament, and a cracking evening/day/lunch/curry/drinks too! Just brilliant.

Oh, and this is what my Polders 'Windmill' board looked like on the day, in its alternative 4x4 configuration: 
[Snail damage was adjusted to become war damage]
'Til next time, then,

Cheers,

- D.

Thursday 27 October 2016

578 - Bolt Action Tourney Aftermath: Part 2 - Prizes!

Where was I?

Oh yes: two games down and lunchtime. The important things here are that (a) I had some nice pizza, (b) I bought some raffle tickets, and (c) me and my mate Mattenbury took some pics of our paired Desert Rats forces on a themed board. Here's one - more to follow next post:
My lot's on the left; Mattenbury's lot on the right.
And yes, those are camels. This tourney was remnant v1 rules,
and cavalry in v1 was still fearsome...even camelcav!

Round 3:

Now I was up against the charismatic Pim and his dastardly Germans. It was a straight 'fight to kill each other' (I forget the name of the mission - winner is decided on order dice killed). The table was fairly open but for a cluster of buildings in the middle, but Pim pushed for us to play that infantry could only see over one wall/hedge, which really restricted lines of sight - especially on his side of the board. Including where he placed his sniper! 

Long story short, I won in every way... except in technically securing a victory: the field was mine - as, we agreed, was the moral victory - but I was only one order dice ahead, so it was a tactical draw. Fair enough!

Man of the Match? - my sniper, without a doubt. Having shaken off his shameful cowardice against the Finns, he opened up the game by taking out Pim's sniper. Nice! Having then relocated to another window, he realised that no more targets were likely to present themselves and so, after the briefest of discussions, he and his spotter leapt out of the window, pegged it past the stunned Panzer outside and fell upon the German command team, pistols a-blazin'. 
Left of centre, toward the end. The washers are Pim's pins;
my sniper (and 2 Sect) are in the building bottom-right.
Shifting right a bit . The German Officer is at the top.
Having killed of the enemy officer, my brave duo were set upon  - at short range in the open - by a squad of six or seven grenadiers (in the pic, above)...and they very nearly won that too: taking it to two rounds and taking yet more Germans with them. Brave lads. 
On the left, my sterling Humber Mk II surges forward.
Actually, it was an uncharacteristically assault-y game for me, as I soon realised that having successfully denied Pim my right flank there was sod-all that I could do to draw a bead on his units unless I charged the crap out of them.

I hadn't much choice but to leave these two units exposed, but
the 25pdr and Crusader dealt out some decent damage,
especially against his tank!
The game ended on turn five or six - had it gone to more then a firm victory would certainly have been mine, but so it goes.

A lovely guy, and a resident of the Netherlands, one of my favourite countries. Thanks, Pim!

Round 4:

Now I got the chance to play on the high table: a 12'x4' table with three parallel battles, and I was on the left of the Allied flank, trying to defend my left-flank base from the Germanic onslaught of Luke's veteran Fallschimjager. 

Luke had a cracking start - his medium mortar took out my sniper and started levelling the building with HE right from the off, but his luck soon started to drip away, and despite early advances, he just couldn't make the dash across open ground to flammenwerfer the crap out of my building without my brave Sikhs laying down just a little too much suppressing fire. It wasn't 'death-by-pinning' but it was 'infuriating-inactivity-by-pinning', and once I'd won the firefight it was just a matter of mopping up. 
Mopping up in the end-game. My table edge is the right of the pic.
My right flank was always bound to be sacrificial, but even as my medium mortar crew were butchered by the three Germans who'd pegged it all the way across to assault them, the 25pdr beside them managed to know out Luke's (woefully unlucky) panzer.

We were - as it happened - allowed to support our allies on flanking tables, but the proud Nordic God known as Svein (TTB founder and Ally on my right) was having none of it. Regardless, I'd set up my arcs to cover him just in case, and the idea of cross-game support was inspired!

Result: after a very shaky start for the Sikhs, a very very comprehensive win. Go Team!

RESULTS:

The day was absolutely stonkingly good, with a top, top group of people there, and the only things which made it even better were that...

(a) I won a prize in the Help for Heroes raffle: I chose a gorgeous Rubicon Models M5A1 Stuart/Stuart Recce...which I've already built and primed! *huge smiles - it's a lovely kit*
Mine's built as the version front-left (sans prongs, of course)
but the recce version (front-right) is interchangeable,
and as that's what 11AD's Stuarts soon became, that is how
mine will mostly be fielded. They called it the 'Stuart Jalopy'.
and 


(b) I was awarded the peer-voted 'Best Themed' award for my Desert Rats Sikhs! 
"Squeeeee!"
Needless to say, I was astounded by this turn-up, and profoundly flattered, because the competition (friendly though it was) was seriously impressive. What a delightful bunch of people the TTB lot are, eh?
My winnings. Such excitement! 11AD didn't really use Churchills -
I mostly got this one because I simply could not resist the kit.
It's gorgeous, and I think it'll become an AVRE attached to my
Sikhs when they start venturing onto Itaalian shores...
As with February's inaugural TTB 'UK Gathering' event, this was all organised by a lovely Irish-Brummie guy called Kieran: we're all indebted to him, and I personally am also indebted to another chap - a Finn called Jarkko who let me crash, borassic, on his hotel room floor.

You know a group of gamers is pleasant when you turn up to the hotel at 2030 on a damp Friday night and they've set up a beautifully themed gaming table in the hotel breakfast room, right by Reception where they're playing a doubles game of Bolt Action watched admiringly by a coachload of pensioners also staying at the hotel. 

Genius.

In my next post there'll be a breakdown of my army list, some other pics (of them and sundry other bits) and some deliberations on future projects...

Cheers all,

- Drax.