Hullo!
Supplemental to my last post [link], here are a few more pics (from my opponent's perspective) and my post-match analysis...such as it is...which are also my first 'post- Bolt action' thoughts.
I shall intersperse the pics - with captions - throughout, for the sake of variety. My notes are transferred verbatim from my 'Seventh Book of Arcane Scribblings' (see here and here):
 |
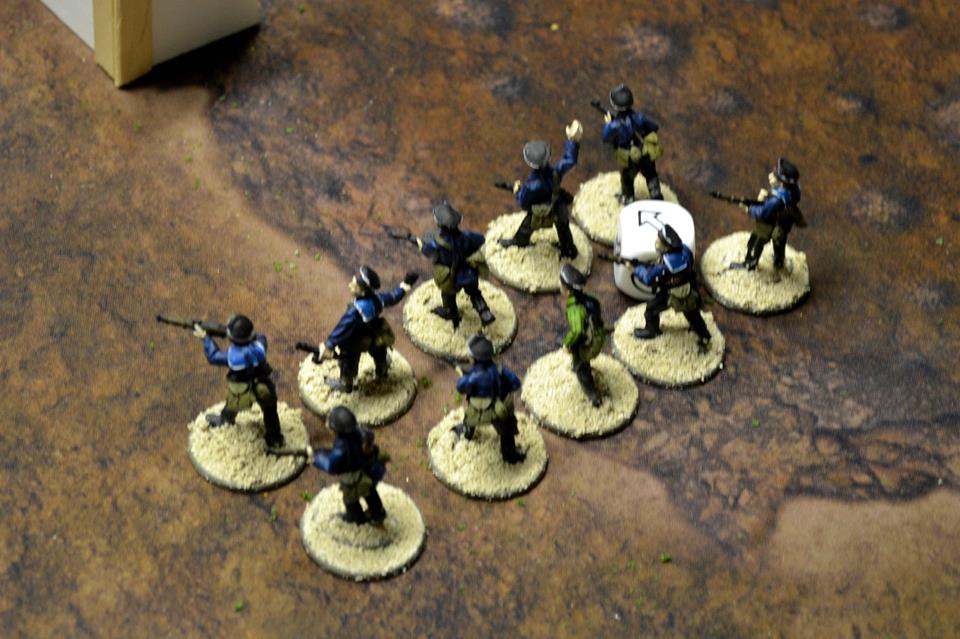
| John's right flank as he assaults, featuring an his sniper (by the building, centre-table); MMG; Divisional AT Gun; Naval Infantry (the 'Black Death', with light bases); T34/85, and some normal infantry on the right). |
Feedback Notes: First Bolt Action (28mm) Game, 30/05/15:
Mission: 'Envelopment' - 1000pts - Defending
- Preliminary bombardment is nasty on the receiving end
- 6pdr got in a sneaky wee shot right across the board to hurt the T34 twice!
- My arty bombardment was BRUTAL - pinned 4 units and destroyed MMG
- --> this effectively stalled his attack on my left flank
 |
| Facing them, the five rifle-armed Toms holding my left flank. There's an MMG in the window too ;-) |
- Remember LOS! Twice my units got in each other's way.
- Remember 1" firing lanes too...
- Star Player: my PIAT-armed universal carrier, which did a lot, but in particular destroyed his two-man flamethrower team with two 6s followed by two 5s! Yay!
- ALL of my carriers did very well: they pushed up with LMGs blazing very effectively
 |
| These chaps lost one man on my right flank. |
- Sniper was rubbish, but drew fire well
- OC ran forward and finished off the last man of a squad with his SMG
- One of my half-sections - by mutual agreement - launched an illicit carrier-borne assault over a hedge...and won!
- PIAT team in carrier did get close enough to use it, but fluffed.
 |
| The Black Death. Very hard to kill. |
- Veteran infantry (like the Navy Boys) are very hard to kill. Very.
- Cromwell positioned itself well, and shot well enough
- MMG team in building did very well
- Don't be absent-minded with dice! - I was TERRIBLE for this: distractedly picking up orders dice left, right and centre.
 |
| The carriers bring the fight to the Russian left... |
- Light A-T guns are actually a lot more powerful than I realised. This seems a little simple for Late-War, but I guess it makes sense within the straightforward rules mechanic.
- Light mortars are super-good - especially with smoke!
- Smoke sticks around very well in Bolt Action...
 |
| ...and to the right, |
- In 'reserves' missions, carriers are great to tow-on the 6pdr and lug the MMG into position. I know this, because I also got in two-and-a-half turns of another game in which I was able to do just this.
Verdict?
Awesome opponent; awesome game.
= win.
Cheers!
- Drax.
PS: 6MMRPC: Time is tight, as I knew it would be, but I've started getting some proper paint onto those Orks...Yay!